参考文章
这篇文章大部分都是参考的下面这位大佬的文章,真的很推荐去看下,写得真的很不错。
前言
JDK 提供的 SPI(Service Provider Interface)机制,可能很多人不太熟悉,因为这个机制是针对厂商或者插件的,也可以在一些框架的扩展中看到。其核心类 java.util.ServiceLoader 可以在 jdk1.8 的文档中看到详细的介绍。虽然不太常见,但并不代表它不常用,恰恰相反,你无时无刻不在用它。玄乎了,莫急,思考一下你的项目中是否有用到第三方日志包,是否有用到数据库驱动?其实这些都和 SPI 有关。再来思考一下,现代的框架是如何加载日志依赖,加载数据库驱动的,你可能会对class.forName("com.mysql.jdbc.Driver")这段代码不陌生,这是每个 java 初学者必定遇到过的,但如今的数据库驱动仍然是这样加载的吗?你还能找到这段代码吗?这一切的疑问,将在本篇文章结束后得到解答。
实现一个自定义的 SPI
1 项目结构
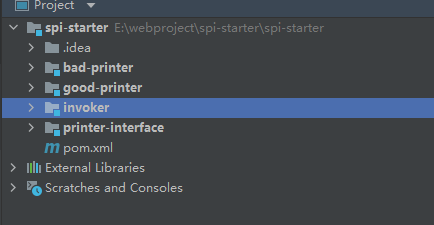
- invoker 是我们的用来测试的主项目。
- interface 是针对厂商和插件商定义的接口项目,只提供接口,不提供实现。
- good-printer,bad-printer 分别是两个厂商对 interface 的不同实现,所以他们会依赖于 interface 项目。
这个简单的 demo 就是让大家体验,在不改变 invoker 代码,只更改依赖的前提下,切换 interface 的实现厂商。
2 interface 模块
2.1 top.ouzhanbo.spi.api.Printer
1 | public interface Printer { |
interface 只定义一个接口,不提供实现。规范的制定方一般都是比较牛叉的存在,这些接口通常位于 java,javax 前缀的包中。这里的 Printer 就是模拟一个规范接口。
3 good-printer 模块
3.1 good-printer\pom.xml
1 | <dependencies> |
规范的具体实现类必然要依赖规范接口
3.2 top.ouzhanbo.spi.api.GoodPrinter
1 | public class GoodPrinter implements Printer { |
作为 Printer 规范接口的实现一
3.3 resources\META-INF\services\top.ouzhanbo.spi.api.Printer
1 | top.ouzhanbo.spi.spi.GoodPrinter |
这里需要重点说明,每一个 SPI 接口都需要在自己项目的静态资源目录中声明一个 services 文件,文件名为实现规范接口的类名全路径,在此例中便是 top.ouzhanbo.spi.api.Printer,在文件中,则写上一行具体实现类的全路径,在此例中便是 top.ouzhanbo.spi.api.GoodPrinter。
4 bad-printer 模块
4.1 bad-printer\pom.xml
我们在按照和 good-printer 模块中定义的一样的方式,完成另一个厂商对 Printer 规范的实现。
1 | <dependencies> |
4.2 top.ouzhanbo.spi.api.BadPrinter
1 | public class BadPrinter implements Printer { |
4.3 resources\META-INF\services\moe.cnkirito.spi.api.Printer
1 | top.ouzhanbo.spi.api.BadPrinter |
这样,另一个厂商的实现便完成了。
5 invoker 模块
5.1 invoker\pom.xml
这里的 invoker 便是我们自己的项目了。如果一开始我们想使用厂商 good-printer 的 Printer 实现,是需要将其的依赖引入。
1 | <dependencies> |
5.2 编写调用主类
1 | public class Invoker { |
ServiceLoader 是 java.util 提供的用于加载固定类路径下文件的一个加载器,正是它加载了对应接口声明的实现类。
5.3 打印结果 1
1 | 你是个好人 ~ |
5.4 更换 invoker\pom.xml 中的 Printer 实现,使用厂商 bad-printer 的 Printer 实现
如果在后续的方案中,想替换厂商的 Printer 实现,只需要将invoker\pom.xml文件中的依赖更换
1 | <dependencies> |
5.5 打印的结果
1 | 我抽烟,喝酒,蹦迪,但我知道我是好女孩 ~ |
是不是很神奇呢?这一切对于调用者来说都是透明的,只需要切换依赖即可!
SPI 的简单源码分析
从 Invoker 上面看应该从 ServiceLoader 的 load 方法进入
1
2
3
4
5
6
7
8
9public class Invoker {
public static void main(String[] args) {
//第一步,调用ServiceLoader的load(Class<S> service)
ServiceLoader<Printer> printerLoader = ServiceLoader.load(Printer.class);
for (Printer printer : printerLoader) {
printer.print();
}
}
}从 ServiceLoader 的调用代码上看,ServiceLoader 是可以迭代的,因为 ServiceLoader 应该实现了 Iterable 接口(这里是个伏笔,后面会 for 循环时会调用实现后的 iterator 方法)

ServiceLoader 的
load(Class<S> service)方法代码1
2
3
4
5public static <S> ServiceLoader<S> load(Class<S> service) {
ClassLoader cl = Thread.currentThread().getContextClassLoader();
//第二步调用ServiceLoader的load(Class<S> service,ClassLoader loader)方法
return ServiceLoader.load(service, cl);
}ServiceLoader 的
load(Class<S> service,ClassLoader loader)方法代码1
2
3
4
5
6public static <S> ServiceLoader<S> load(Class<S> service,
ClassLoader loader)
{
//第三步,调用构造方法创建了一个ServiceLoader
return new ServiceLoader<>(service, loader);
}ServiceLoader 的构造方法
1
2
3
4
5
6
7private ServiceLoader(Class<S> svc, ClassLoader cl) {
service = Objects.requireNonNull(svc, "Service interface cannot be null");
loader = (cl == null) ? ClassLoader.getSystemClassLoader() : cl;
acc = (System.getSecurityManager() != null) ? AccessController.getContext() : null;
//第四步,调用ServiceLoader的reload()方法
reload();
}ServiceLoader 的 reload() 方法
1
2
3
4
5public void reload() {
providers.clear();
//第五步,创建了一个LazyIterator对象
lookupIterator = new LazyIterator(service, loader);
}LazyIterator 是 ServiceLoader 的一个实现了 Iterator 的内部类,到这里好像还没有看到任何读取文件
resources\META-INF\services\moe.cnkirito.spi.api.Printer,并且加载该类和创建一个该类对象的代码我上面说的伏笔就在这里,真正读取
resources\META-INF\services\moe.cnkirito.spi.api.Printer文件并且创建文件中指定的类对应的对象的逻辑都在这个 for 循环时调用 iterator 方法里面,先看下 ServiceLoader 实现的 iterator 方法1
2
3
4
5
6
7
8
9
10
11
12
13
14
15
16
17
18
19
20
21
22
23public Iterator<S> iterator() {
return new Iterator<S>() {
Iterator<Map.Entry<String,S>> knownProviders
= providers.entrySet().iterator();
//for循环时先调用hasNext判断是否存在下个节点
public boolean hasNext() {
//第一次for循环时 knownProviders.hasNext()为false,因为在前面第五步的时候执行过 providers.clear()
if (knownProviders.hasNext())
return true;
//所以第一次for循环会执行到执行到这一步,这里的lookupIterator是在第五步创建的LazyIterator对象
return lookupIterator.hasNext();
}
//for循环调用next获取下个节点对象
public S next() {
if (knownProviders.hasNext())
return knownProviders.next().getValue();
return lookupIterator.next();
}
};
}LazyIterator 的 hasNext 方法
1
2
3
4
5
6
7
8
9
10
11public boolean hasNext() {
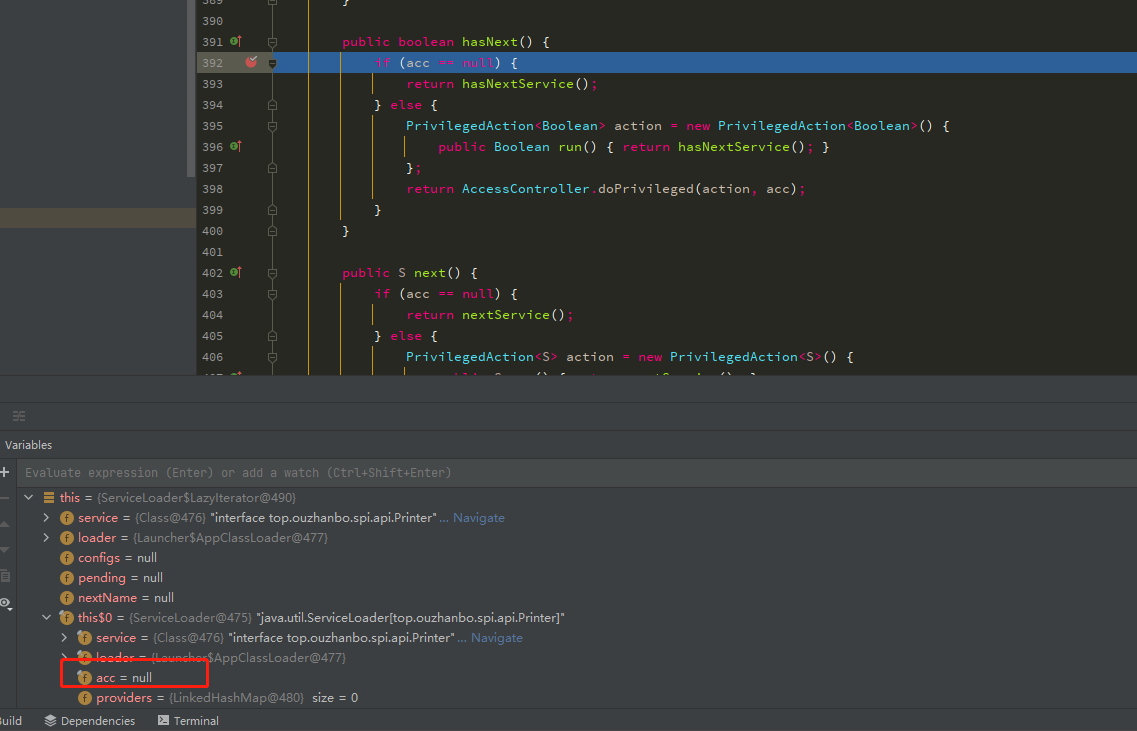
if (acc == null) {
//因为acc为null所以调用 hasNextService
return hasNextService();
} else {
PrivilegedAction<Boolean> action = new PrivilegedAction<Boolean>() {
public Boolean run() { return hasNextService(); }
};
return AccessController.doPrivileged(action, acc);
}
}这里的 acc 是在第四步
acc = (System.getSecurityManager() != null) ? AccessController.getContext() : null;这段代码初始化的,通过断点调试发现最终 acc 为 null 所以调用直接调用 hasNextService 这个方法,断点调试结果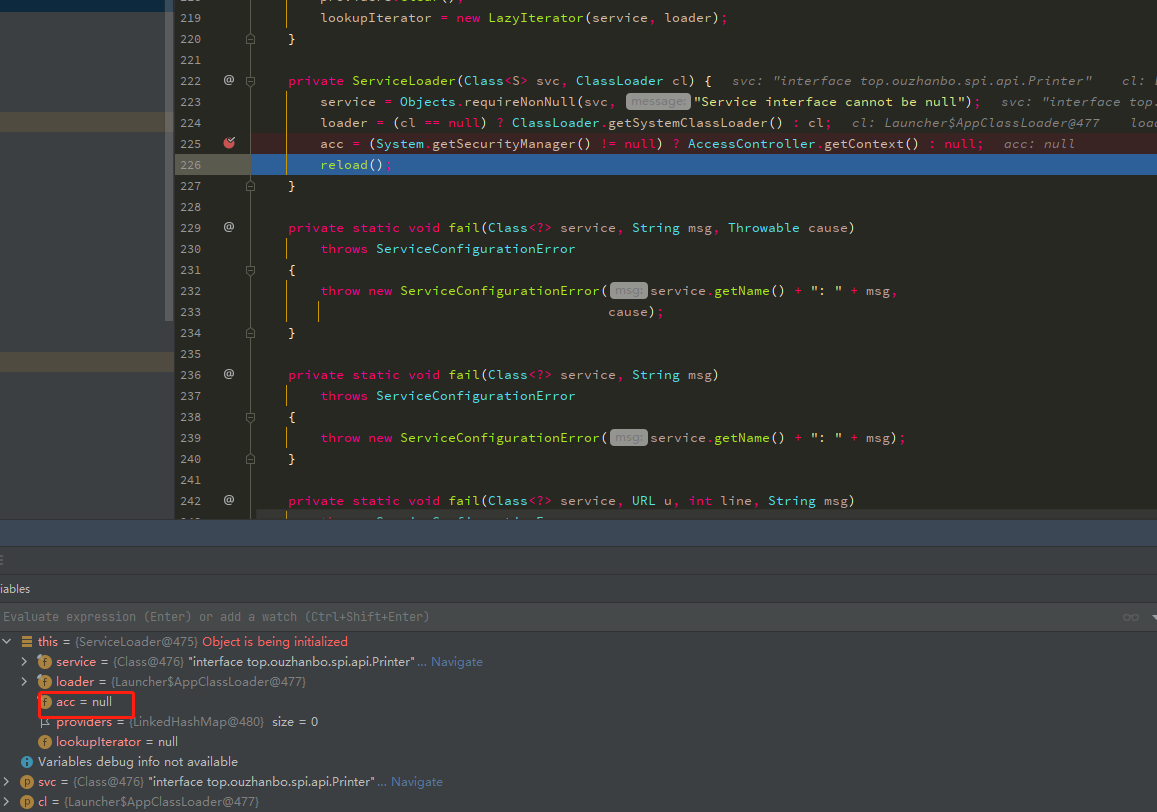
LazyIterator 的 hasNextService 方法
1
2
3
4
5
6
7
8
9
10
11
12
13
14
15
16
17
18
19
20
21
22
23
24
25
26
27
28
29
30
31
32
33
34
35
36
37
38
39
40
41
42
43
44
45
46
47
48
49
50
51
52
53
54
55
56
57
58public final class ServiceLoader<S>
implements Iterable<S>
{
private static final String PREFIX = "META-INF/services/";
private class LazyIterator
implements Iterator<S>
{
Class<S> service;
ClassLoader loader;
Enumeration<URL> configs = null;
Iterator<String> pending = null;
String nextName = null;
private LazyIterator(Class<S> service, ClassLoader loader) {
this.service = service;
this.loader = loader;
}
private boolean hasNextService() {
//nextName初始值为null
if (nextName != null) {
return true;
}
if (configs == null) {
try {
//PREFIX的值为META-INF/services/,service 是传入的Printer.class
String fullName = PREFIX + service.getName();
if (loader == null)
configs = ClassLoader.getSystemResources(fullName);
else
//得到的fullName为META-INF/services/top.ouzhanbo.spi.api.Printer
//并且将类路径下的META-INF/services/top.ouzhanbo.spi.api.Printer加载进来放入configs
configs = loader.getResources(fullName);
} catch (IOException x) {
fail(service, "Error locating configuration files", x);
}
}
//这段代码自己调试一下,会比较清楚
while ((pending == null) || !pending.hasNext()) {
//configs.hasMoreElements()这段代码可以自己调试看下
if (!configs.hasMoreElements()) {
return false;
}
//configs.nextElement()这段代码也可以自己调试看下
//调试后发现configs是个CompoundEnumeration对象
//并且获取到的是configs.nextElement()获取到的是该对象里面的Enumeration<E>[] enums数组的第二个元素
//并且该元素是个URLClassLoader类中匿名实现的一个Enumeration对象
pending = parse(service, configs.nextElement());
}
///META-INF/services/top.ouzhanbo.spi.api.Printer文件中声明的类
//如果BadPrinter和GoodPrinter都依赖进来会怎么样呢?所以最好自己调试一下上面我说的那段代码就清楚了
nextName = pending.next();
return true;
}
}
}String fullName = PREFIX + service.getName()执行后的到的 fullName 就是META-INF/services/top.ouzhanbo.spi.api.Printer,并且最终获取到的 nextName 为top.ouzhanbo.spi.api.BadPrinter,并且返回 true,最终 ServiceLoader 的 hasNext 返回 true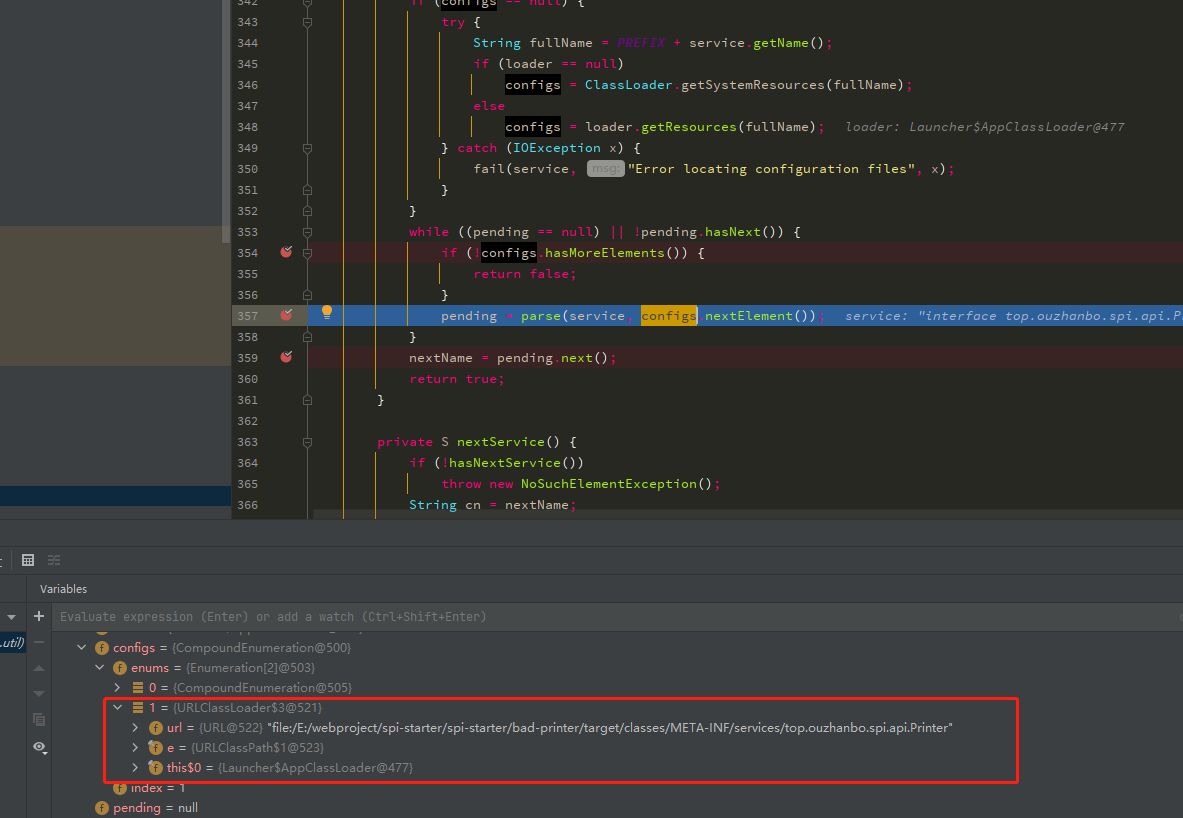
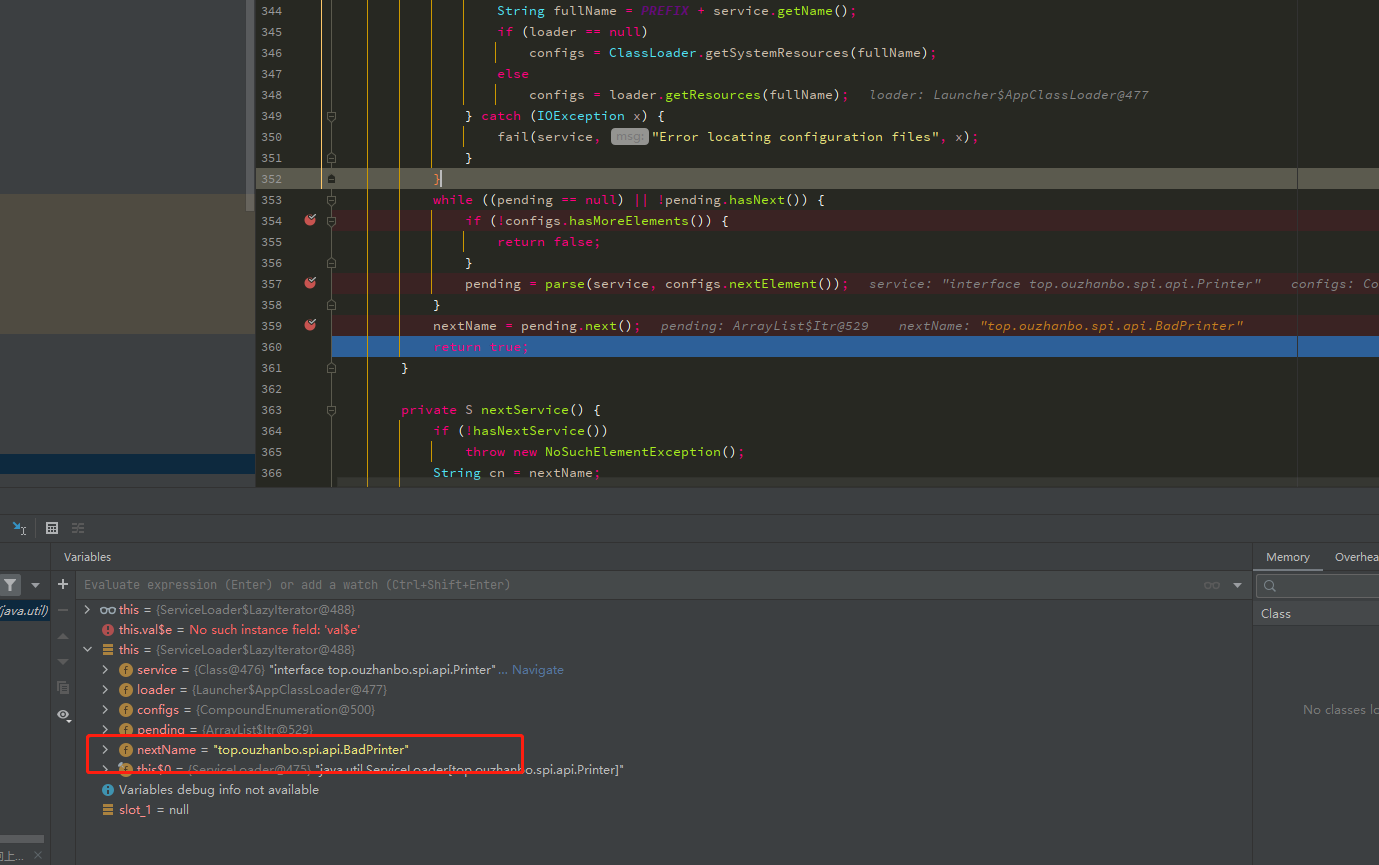
ServiceLoader 的 hasNext 返回 true 后就会执行 ServiceLoader 的 next 方法获取下一个节点的对象
1
2
3
4
5
6
public S next() {
if (knownProviders.hasNext())
return knownProviders.next().getValue();
return lookupIterator.next();
}这里 next 方法的调用和上面的 ServiceLoader 的 hasNext 差不多(这里就不再赘述,可以自己调试看下),最后会进入到 LazyIterator 的 nextService 方法里面
1
2
3
4
5
6
7
8
9
10
11
12
13
14
15
16
17
18
19
20
21
22
23
24
25
26
27
28
29
30
31
32
33private S nextService() {
//这里还会调用多一次hasNextService方法,不过因为nextName已经有值,所以直接返回true
if (!hasNextService())
throw new NoSuchElementException();
//nextName在这个例子里面的值是top.ouzhanbo.spi.api.BadPrinter
String cn = nextName;
//这里将nextName清理是为了多个接口的实现时,hasNextService可以获取到所有的实现类(这里可以留意一下hasNextService里nextName != null)
nextName = null;
Class<?> c = null;
try {
//最终将nextName对应的类加载进来
c = Class.forName(cn, false, loader);
} catch (ClassNotFoundException x) {
fail(service,
"Provider " + cn + " not found");
}
if (!service.isAssignableFrom(c)) {
fail(service,
"Provider " + cn + " not a subtype");
}
try {
//将加载进来的类通过反射创建一个实例并且强制转化为service(这里对应的是top.ouzhanbo.spi.api.Printer.class)这种类型
S p = service.cast(c.newInstance());
//放入provioders中,下次再for循环就通过上面第六步将其转为knownProviders,就不需要再重复加载和创建
providers.put(cn, p);
return p;
} catch (Throwable x) {
fail(service,
"Provider " + cn + " could not be instantiated",
x);
}
throw new Error(); // This cannot happen
}最终将在 pom 中依赖进来并且在
resources/META-INF/services/top.ouzhanbo.spi.api.Printer文件中声明的类加载进来并且实例化一个该类的对象并返回给上层,所以通过这种机制可以实现在不改变调用代码的情况下,通过改变依赖来实现通实现的替换
SPI 在实际项目中的应用
现在大部分的项目都用了 mysql,这个时候就需要在 pom 中引入mysql-connector-java用于数据连接
1 | <dependency> |
里面就有一个java.sql.Driver的实现
1 | public class Driver extends NonRegisteringDriver implements java.sql.Driver { |
并且在该 jar 包下存在META-INF/services/java.sql.Driver这个文件并且文件的内容为这个是这个实现类的全类名
1 | com.mysql.cj.jdbc.Driver |
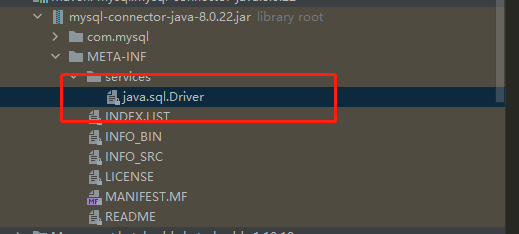
既然说到了数据库驱动,索性再多说一点,还记得一道经典的面试题:Class.forName("com.mysql.jdbc.Driver") 到底做了什么事?要想清楚这个问题我们可以先看看com.mysql.jdbc.Driver(这里因为我用的是 mysql8,所以上面META-INF/services/java.sql.Driver里面的内容是com.mysql.cj.jdbc.Driver)
1 | public class Driver extends com.mysql.cj.jdbc.Driver { |
乍一看好像上面都没有,只打印了两句话,翻译一下大概的意思是
1 | 'com.mysql.jdbc.Driver'已被弃用。新的驱动类是'com.mysql.cj.jdbc.Driver'。该驱动类通过SPI自动注册,一般不需要手动加载驱动类 |
按照这句话的意思已经不再需要用Class.forName("com.mysql.jdbc.Driver")来加载驱动类了,是通过 SPI 加载的,至于这个 SPI 是怎么加载数据库驱动的我们后面再说,先看看Class.forName("com.mysql.jdbc.Driver")这种老方法怎么加载驱动的。
既然在com.mysql.jdbc.Driver这类中没看到想要的东西我们就去他的父类com.mysql.cj.jdbc.Driver中找
1 | public class Driver extends NonRegisteringDriver implements java.sql.Driver { |
在上面的静态代码块里创建了一个`的实例并且通过java.sql.DriverManager将其注册,我们继续往registerDriver(java.sql.Driver driver)这个方法里面深入最后会在java.sql.DriverManager里面的registerDriver(java.sql.Driver driver,DriverAction da)`这个方法
1 | public static synchronized void registerDriver(java.sql.Driver driver, |
registeredDrivers 是个 DriverManager 里的一个静态列表,在上面的代码中看出如果这个驱动如果不存在就会被加入到 registeredDrivers 这个列表中

前面源码里面说了新的驱动类是com.mysql.cj.jdbc.Driver。该驱动类通过 SPI 自动注册,一般不需要手动加载驱动类,那我们来看看com.mysql.cj.jdbc.Driver是如何通过 SPI 加载的,想想我们Class.forName("com.mysql.jdbc.Driver")之后就需要调用Connection connection = DriverManager.getConnection(String url, String user, String password),所以我们先看下 DriverManager 这个类的代码,发现里面有段静态代码
1 | static { |
loadInitialDrivers 这个方法说得很明白,就是加载初始驱动,直接点进去看下这个方法的实现
1 | private static void loadInitialDrivers() { |
最终我们了解了为什么在不使用 Class.forName 的情况下,驱动类是如何通过 SPI 实现自动加载的
说到这里我们来说点无关的,看看Connection connection = DriverManager.getConnection(String url,String user, String password)是怎么获取正确的数据库连接的,进入代码我们最后会发现进入了下面这个方法
1 | // Worker method called by the public getConnection() methods. |
在代码上面有有句注释Walk through the loaded registeredDrivers attempting to make a connection,大致意思是说遍历已加载的已注册驱动程序以尝试建立连接,再结合下面遍历 registeredDrivers 的代码看出该方法是通过遍历 registeredDrivers 从中一个个取出驱动,然后根据输入的连接信息一个个的尝试创建数据库连接,创建成功就将该连接返回
最后看了上面的数据库驱动加载的源码分析就可以把上面的面试题回答了,Class.forName("com.mysql.jdbc.Driver")调用到驱动类里面的静态代码块,在静态代码块里创建了一个驱动类的实例并且通过java.sql.DriverManager将其注册到 java.sql.DriverManager 里面的静态列表 registeredDrivers 中,并且在现在新的数据库驱动已经不再需要通过 Class.forName 加载而是是用 SPI 的机制加载了